
Last Updated on February 10, 2023
Looking to take your desserts up a notch? Want to add some unique and incredible decorations to your desserts? If so, you will want to know how to make your own chocolate transfer sheets.
Using transfer sheets allows you to put different images and pictures onto your desserts. They are completely edible and are perfect for creating customized desserts for special events. By making your own chocolate transfer sheets, you can create bakery-quality desserts for your next big party.
What are Transfer Sheets?
Transfer sheets are special sheets made entirely of edible ingredients that allow bakers to put images and pictures onto desserts. An edible printer is used to print your design or picture of choice onto blank simi transfer sheets. The design or picture can then be transferred to chocolate, frosting, or fondant to create an incredible dessert.
You can buy your edible printer and blank simi transfer sheets so you can print off your designs at home. However, you can also order transfer sheets online that already have designs on them. Some companies will even allow you to make custom orders of your own designs or pictures.
What You Will Need: How to Make Chocolate Transfer Sheets
Ingredients
To make printed chocolate transfer sheets, you will need:
- White, Milk, or Dark chocolate melting wafers
- Desserts of choice
Equipment
- Edible Printer
- Blank Simi Transfer Sheets
- Images to print
- Microwave safe bowl
- Baking tray
- Parchment paper
- Offset spatula
- Piping bag (optional)
- Sharp knife
- Cookie cutters (optional)
Step-by-Step Instructions
Step One: Choose Your Image and Print Your Edible Paper
Decide on what image you would like to print on your edible paper. You can choose pictures, patterns, designs or shapes to be printed onto your edible paper.
Once you have decided on an image, use your edible printer to print it onto your blank simi transfer sheets. Alternatively, if you do not have a printer then you can buy your own transfer sheets online that are available in different designs.
Chocolate Transfer Sheet: “Splendor.” 1 Sheet

Step Two: Melt Your Chocolate Wafers
In a microwave-safe bowl, melt your white, milk, or dark chocolate wafers. Microwave in 30 seconds intervals at half power until your chocolate is fully melted. Allow the melted chocolate to cool for a couple of minutes before using it.
Instead of using a microwave-safe bowl, you can also use a double broiler to melt your chocolate. Bring a pot of water to a simmer and place your broiler above the pan, allowing the chocolate to melt.
Step Three: Add the Chocolate to the Transfer Paper
Lay your transfer paper down on a large baking tray lined with parchment paper or a silicone baking mat. Pour your melted chocolate onto your transfer paper, using an offset spatula to smooth it out. Then, allow the chocolate to cool for 1o minutes at room temperature before peeling off the protective plastic.
In addition, you can also add your chocolate to a piping bag and pipe different designs onto the transfer sheet. Let the piped chocolate shape dry for around 10 minutes. Once dry, carefully pick them up and the designs will be set on the chocolate.
Step Four: Shape Your Chocolate Transfer Sheet
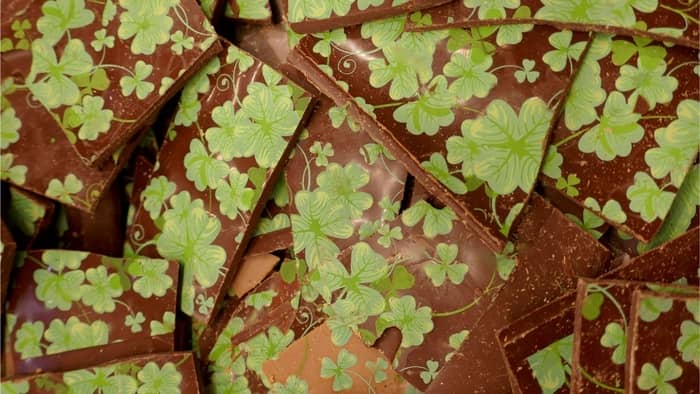
Once your chocolate transfer sheet has dried, you can use a sharp knife to cut the chocolate into pieces. In addition, you can also use cookie cutters to cut out different shapes of chocolate.
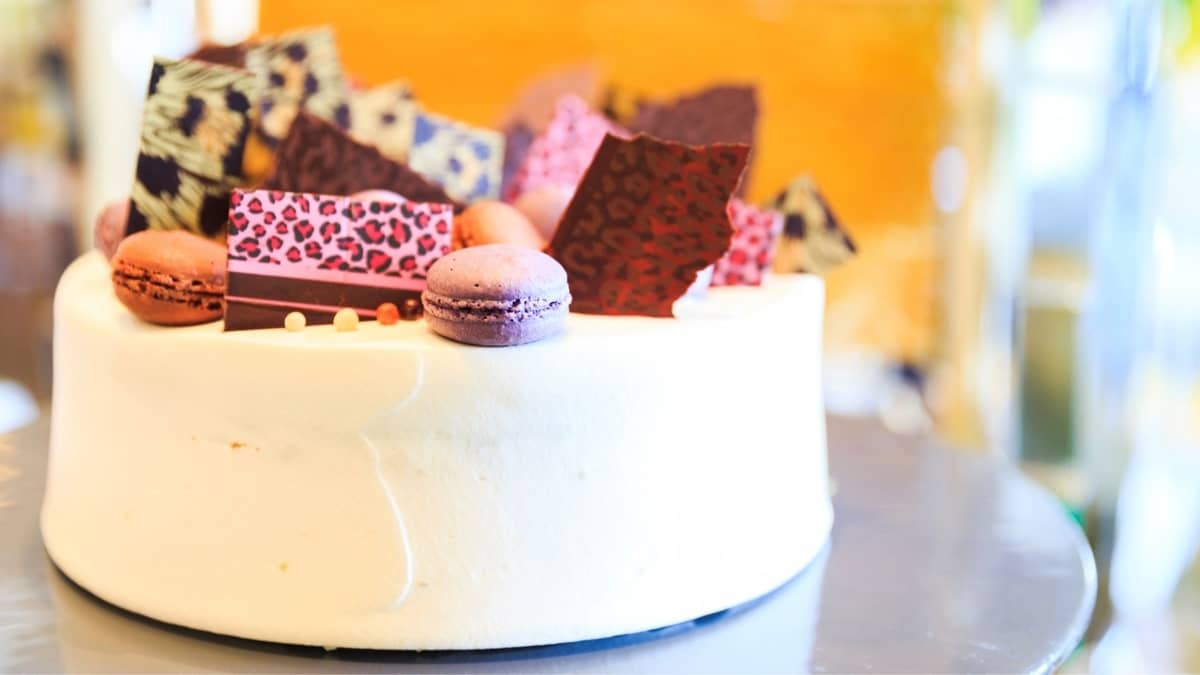
Then, you can place your chocolate transfer sheets on different desserts to create beautiful decorations. Alternatively, you can also serve the chocolate pieces as is as a favor or as a side dish at a party.
Tips and Tricks
Though you can use any type of chocolate for transfer sheets, white chocolate is generally the best one to use. White chocolate will generally show off colored designs and images better than milk or dark chocolate will. However, you can always experiment with different types of chocolates and different designs when using transfer sheets.
Printing chocolate transfer sheets can be tricky, so it may take a few tries to get it right. It is best to have enough chocolate to do a practice round in case it doesn’t turn out the way you want it to. Don’t be surprised if it takes you a few tries to get right when you are first working with edible images.
If you have your own edible printer, be sure to carefully read all the instructions so you understand how to properly use it. They are designed to print only transfer sheets and use only food-safe inks.
Be sure to let your chocolate fully dry on the sheets before cutting it into pieces. If it is not totally dry, then your edible image might not correctly transfer onto it. Be sure to also spread your chocolate out as smoothly as possible to create an even, flat surface.
You can add your chocolate transfer sheets to different desserts such as cakes, cupcakes, cheesecakes, cookies, and brownies. It will make a beautiful and elegant addition to any of your favorite desserts.
What is Water Transfer Printing?
Water transfer printing is better known as hydrographic printing. This type of printing is ideal for printing designs of your choice onto any object you’d like. As long as the object can be placed underwater, then you can use water transfer printing to add a design to it – it is that easy!
However, this process isn’t for beginners and is mainly used by larger-scale production companies. It’s not often used for food; instead is used for items such as car parts. If you’d like to know how to achieve water transfer printing, just follow the method below. Let’s take a closer look.
How to Hydrographic: Method
Water transfer printing just requires a few simple steps. Here’s how to hydrographic:
- Decide on a design or image of your choice. There’s a huge selection to choose from online if you need some inspiration. You need to be sure it’s printed on hydrographic film.
- Base coating is one of the most important steps for water transfer printing. You can choose from a range of colors for your base coat, but it should match the vibe of the color you’re using on top. For example, if you’re printing on wood, you may benefit from a brown base coat.
- Once you’ve finished your base coat, you can place your film onto the water. After a few minutes, the film will disappear, leaving you with your design.
- Once it’s dissolved and the design is left in the water, apply an activator. Then you can dip the object you want to be printed into the water, into the design. This is where the magic happens – the design will shape your object naturally.
- Rinse and remove any excess that shouldn’t be there and then leave to dry. To finish, add a protective coat to your object, to ensure long-lasting results.
How to Use Cocoa Butter Transfer Sheets
Using cocoa butter transfer sheets couldn’t be easier. Here’s a step-by-step guide to using them effectively. Let’s take a closer look.
- Cut your transfer to the size and shape of your choice; ensuring it fits snugly into your mold. Add the cocoa butter transfer sheet to the mold (cocoa side facing up). Ensure it is secure.
- Add chocolate to the cavities of the mold; you can do this with a bottle or a simple spoon. Once each hole is filled, tap gently to ensure even distribution and no bubbles remain. Smooth over and chill in the freezer.
- Once set, peel the cocoa butter and transfer the sheet back. Your patterned chocolates are ready!
There are other methods you can try to achieve this, but this method is the easiest for beginners.
Where to Buy Printable Chocolate Piping Templates
There are printable chocolate piping templates available from online stores such as Amazon and Etsy. However, on websites such as Pinterest, there are plenty of chocolate piping templates available for free, and they have a huge selection from letters, to numbers, to faces, shapes, and more. You can check out one of my favorite Pinterest boards for chocolate piping templates here.
Knowing How to Make Your Chocolate Transfer Sheets at Home
If you are wanting to get creative with your baking skills, making your own chocolate transfer sheets is a beautiful way to do so. Though it may take some practice to get right, the results will definitely be impressive and well worth it once you do it.
You can get creative and use any type of chocolate and any design or picture to make incredible edible art. It is a wonderful way to impress your friends and family and make a showstopping dessert for your next party. Whether you have your own edible printer or buy sheets online, you can still make these fun and creative dessert decorations.
Did you enjoy this tutorial on how to make your own chocolate transfer sheets? If so, please share your thoughts in the comment section down below and share this tutorial for making chocolate transfer sheets with your friends and family.
Make Your Own Chocolate Transfer Sheets:How-To
Equipment
- Edible Printer
- Blank Simi Transfer Sheets
- Images to print
- Baking Tray
- Parchment paper
- Piping bag (optional)
- Sharp Knife
- Cookie cutters (optional)
Ingredients
- White Milk, or Dark chocolate melting wafers
- Desserts of choice
Instructions
- Choose your image and print your edible paper.Decide on what image you would like to print on your edible paper. You can choose pictures, patterns, designs or shapes to be printed onto your edible paper.Once you have decided on an image, use your edible printer to print it onto your blank simi transfer sheets. Alternatively, if you do not have a printer then you can buy your own transfer sheets online that are available in different designs.
- Melt your chocolate wafers.In a microwave-safe bowl, melt your white, milk, or dark chocolate wafers. Microwave in 30 seconds intervals at half power until your chocolate is fully melted. Allow the melted chocolate to cool for a couple of minutes before using.Instead of using a microwave-safe bowl, you can also use a double broiler to melt your chocolate. Bring a pot of water to a simmer and place your broiler above the pan, allowing the chocolate to melt.White Milk, or Dark chocolate melting wafers
- Add the chocolate to the transfer paper.Lay your transfer paper down on a large baking tray lined with parchment paper or a silicone baking mat. Pour your melted chocolate onto your transfer paper, using an offset spatula to smooth it out. Then, allow the chocolate to cool for 1o minutes at room temperature before peeling off the protective plastic.In addition, you can also add your chocolate to a piping bag and pipe different designs onto the transfer sheet. Let the piped chocolate shape dry for around 10 minutes. Once dry, carefully pick them up and the designs will be set on the chocolate.
- Shape your chocolate transfer sheet.Once your chocolate transfer sheet has dried, you can use a sharp knife to cut the chocolate into pieces. In addition, you can also use cookie cutters to cut out different shapes of chocolate.Then, you can place your chocolate transfer sheets on different desserts to create beautiful decorations. Alternatively, you can also serve the chocolate pieces as is as a favor or side dish at a party.Desserts of choice
Notes

Ever since she was a young girl, Anna has been a lover of desserts. As an adult, she enjoys
baking a variety of desserts from cakes, cookies, brownies, bread, and more from scratch. She
enjoys sharing her passion for baking with others who also have a sweet tooth. From properly
measuring ingredients to making sure they are the correct temperature, Anna knows the
importance small details can make in baking. She wants to share her experience with others in
hopes they can make the most delicious baked goods. When she’s not busy blogging, Anna
enjoys trying new recipes in the kitchen.