
Last Updated on March 25, 2022
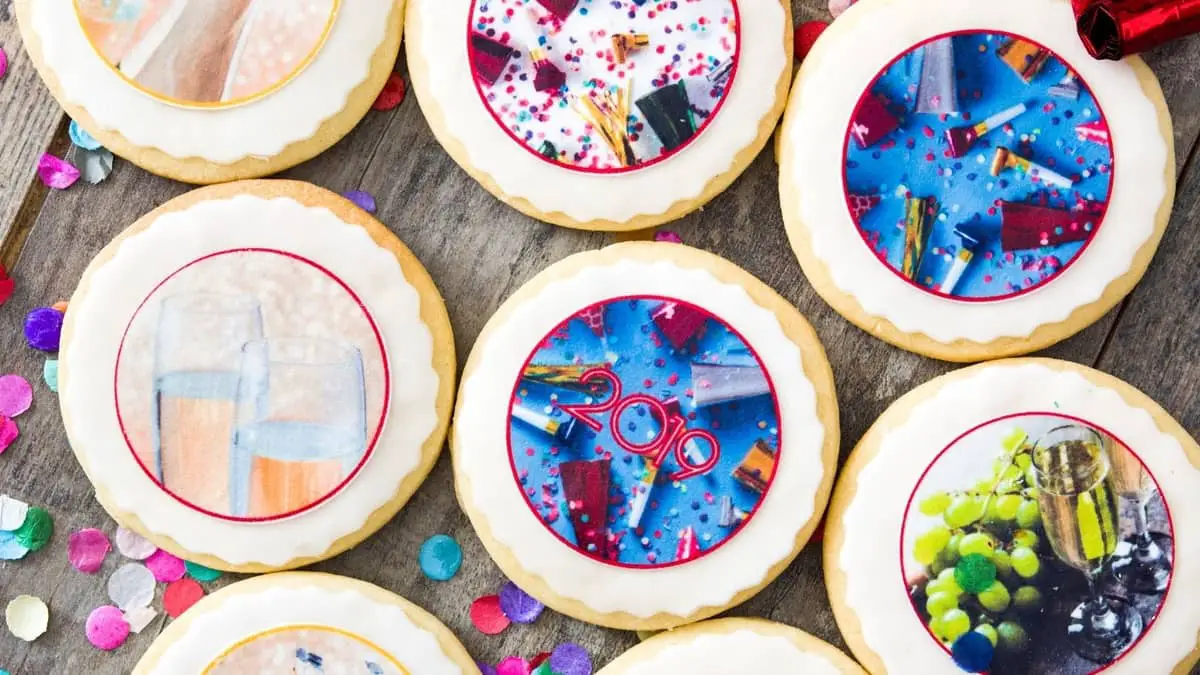
Are you planning on making cookies for your child’s birthday party? Why not delicious cookies with pictures on them? Talk about making something creative and tasty as giveaways! Customized cookies are the perfect giveaway ideas for parties like birthdays and Christening. Also, custom cookies with pictures give it a more personalized touch for your giveaways. So what are you waiting for? Try making these at home, and with these easy step-by-step instructions, you can make these cookies effortlessly.
What You Will Need In Making Delicious Cookies With Pictures On Them
Ingredients
For the sugar cookies
- 2 1/4 cups of all-purpose flour
- 1/2 tsp of baking powder
- 1/4 tsp of salt
- 3/4 cups of unsalted butter, softened to room temperature
- 3/4 cups of granulated sugar
- One large room temped egg
- 2 tsp of pure vanilla extract
- 1/4 tsp of almond extract
For the royal icing
- 4 cups of powdered sugar, sifted
- 3tbs of meringue powder
- 9-10 tbsp of room temped water
- Food coloring of your choice
Equipment
- Scissors
- Rectangular cookie cutter
- Piping bags
- Piping tips
- Oven
- Stand mixer
- Measuring cups
- Measuring spoons
- Mixing bowls
- Rubber spatula
- Rolling pin
- Parchment paper
- Plastic cling wrap
- Oven
- Clear cookie bags
- Ribbons
Servings and preparation time
Preparation Time: 2 hours and 10 minutes
Cooking Time: 12 minutes
Yields: 18-20 cookies
R&M International Fluted Rectangle Cookie and Biscuit Cutters

Step by step instructions
Step 1
Choose a photo of your choice, create a word document. And resize your image with the size of your rectangular cookie cutter. Afterward, fill the word document with photos of your choice. Keep in mind that you can fit 12 pictures on one page or more.
Step 2
Then, go to your local bakers. And ask them to print your word document into edible paper. Remember, they may use wafer papers or sugar sheets and edible inks. After that, cut out the pictures and set them aside for later.
For the cookies
Step 1
Before anything else, place your flour, baking powder, and salt in a medium bowl. Then, whisk together and make sure to set aside.
Step 2
After that, beat your butter and sugar using an electric mixer fitted with a paddle attachment. And make sure to set it at high speed. Then, beat for two minutes or until it becomes smooth and creamy. Afterward, add your egg, vanilla, and almond extract. And be sure to beat on high for about a minute or until well combined. Also, scrape down the sides and the bottom using a rubber spatula. And be sure to beat again to combine properly.
Step 3
Then, add your dry ingredients with wet ingredients. Afterward, set your mixer to low until well combined. Also, if your dough is too sticky and soft, add a tablespoon of flour and knead again.
Step 4
Next, split your dough into two parts. And be sure to place each part into a piece of lightly dusted silicone mat. Afterward, dust your rolling pin using flour and roll out your dough into 1/4 inch thick. Remember, you can add more flour if your dough is sticky. Also, do the same process with the second part of the dough.

Step 5
Afterward, lightly dust one of your rolled dough with flour. And make sure to place parchment paper on top. Also, place the second part of your dough on top. Then, cover your dough with plastic cling wrap and refrigerate for one to two hours.
Step 6
Start preheating the conventional oven to 350 degrees Fahrenheit. Then, line your 2 to 3 large baking sheets with parchment paper. Afterward, gently remove the top piece of your chilled dough from the refrigerator. Also, use your cookie cutter of the same size as your photo. And ensure to cut your dough. Then, re-roll your dough scraps and cut more. In addition to that, repeat the process for the second part of your dough. Also, re-roll the dough scraps until you don’t have anymore.
Step 7
Ultimately, position your cookies 3 inches apart onto your baking sheets. Then, bake for about 11 to 12 minutes. Or bake until light golden brown around the edges. Afterward, allow your sugar cookies to cool on the baking sheet for about 5 minutes. And be sure you transfer to a wire rack to cool completely.
For the royal icing
Step 1
Place your powdered sugar, meringue powder, and nine tablespoons of water inside a mixing bowl. Then, whisk ingredients at high speed for about a minute and a half to two minutes. With this, make sure to utilize an electric mixer. When you lift the whisk off the icing, the icing should drizzle down. Likewise, it should smooth out for about 5 to 10 seconds.
Step 2
If the icing becomes too thick, be sure to add a tablespoon of water. Make sure to do so until you attain the right consistency. And if your icing is too thin, add more powdered sugar. Then, divide your royal icing into how many colors you want to have. But make sure to leave one part of uncolored icing. Afterward, place your uncolored royal icing inside a piping bag. And your colored icing into different piping bags with a small tip of your choice.
Cookie assembly
Step 1
When your cookies have cooled down, take your uncolored royal icing. After that, pipe a royal icing border around the edges of your cookies. Then, pipe only on completely cooled cookies. The main reason is that warm cookies will make your royal icing messy and runny.
Step 2
Fill the border of your cookie with a thin layer of royal icing. Then, peel the photo decal. And be sure to place your photo gently on top of your cookie. Afterward, secure your edible picture by pressing gently.
Step 3
After that, be sure to repeat the process in all of your cookies. And be sure you allow them to sit for a little while.
Step 4
Take your colored royal icing and pipe a decorative border around the photo in your cookies. Also, the colored icing will resemble a frame for your photo.
Step 5
Allow your decorated photo cookies to set. And be sure to leave it uncovered overnight to dry.
Step 6
After your cookies have dried completely, place them inside clear cookie bags. And make sure to tie the bag with a ribbon. As always, share and enjoy!
Tips And Tricks
You can store plain or undecorated sugar cookies inside the freezer for three months. Moreover, be sure to store unrolled sugar cookie dough inside the freezer for three months.
Also, using room-temped butter is important for this recipe. In addition to that, with a room-temped egg, it is easier to mix it into the cookie dough.
Besides, you can add flavor to your cookie if desired. Plus, you can use extracts like coconut, maple, lemon, peppermint, pumpkin spice, or ground cinnamon.
Read more about How To Make Your Own Chocolate Transfer Sheets
Delicious Cookies With Pictures On Them
Equipment
- Scissors
- Rectangular cookie cutter
- Piping bags
- Piping tips
- Oven
- Measuring cups
- Measuring Spoons
- Mixing bowls
- Rolling Pin
- Parchment paper
- Plastic cling wrap
- Oven
- Clear cookie bags
- Ribbons
Ingredients
- 2 1/4 cups of all-purpose flour
- 1/2 tsp of baking powder
- 1/4 tsp of salt
- 3/4 cups of unsalted butter, softened to room temperature
- 3/4 cups of granulated sugar
- One large room temped egg
- 2 tsp of pure vanilla extract
- 1/4 tsp of almond extract
For the royal icing
- 4 cups of powdered sugar, sifted
- 3 tbs of meringue powder
- 9-10 tbsp of room temped water
- Food coloring of your choice
Instructions
- Choose a photo of your choice, create a word document. And resize your image with the size of your rectangular cookie cutter. Afterward, fill the word document with photos of your choice. Keep in mind that you can fit 12 pictures on one page or more.
- Then, go to your local bakers. And ask them to print your word document into edible paper. Remember, they may use wafer papers or sugar sheets and edible inks. After that, cut out the pictures and set them aside for later.
For the cookies
- Before anything else, place your flour, baking powder, and salt in a medium bowl. Then, whisk together and make sure to set aside.2 1/4 cups of all-purpose flour, 1/2 tsp of baking powder, 1/4 tsp of salt
- After that, beat your butter and sugar using an electric mixer fitted with a paddle attachment. And make sure to set it at high speed. Then, beat for two minutes or until it becomes smooth and creamy. Afterward, add your egg, vanilla, and almond extract. And be sure to beat on high for about a minute or until well combined. Also, scrape down the sides and the bottom using a rubber spatula. And be sure to beat again to combine properly.3/4 cups of unsalted butter, softened to room temperature, 3/4 cups of granulated sugar, One large room temped egg, 2 tsp of pure vanilla extract, 1/4 tsp of almond extract
- Then, add your dry ingredients with wet ingredients. Afterward, set your mixer to low until well combined. Also, if your dough is too sticky and soft, add a tablespoon of flour and knead again.
- Next, split your dough into two parts. And be sure to place each part into a piece of lightly dusted silicone mat. Afterward, dust your rolling pin using flour and roll out your dough into 1/4 inch thick. Remember, you can add more flour if your dough is sticky. Also, do the same process with the second part of the dough.
- Afterward, lightly dust one of your rolled dough with flour. And make sure to place parchment paper on top. Also, place the second part of your dough on top. Then, cover your dough with plastic cling wrap and refrigerate for one to two hours.
- Start preheating the conventional oven to 350 degrees Fahrenheit. Then, line your 2 to 3 large baking sheets with parchment paper. Afterward, gently remove the top piece of your chilled dough from the refrigerator. Also, use your cookie cutter of the same size as your photo. And ensure to cut your dough. Then, re-roll your dough scraps and cut more. In addition to that, repeat the process for the second part of your dough. Also, re-roll the dough scraps until you don't have anymore.
- Ultimately, position your cookies 3 inches apart onto your baking sheets. Then, bake for about 11 to 12 minutes. Or bake until light golden brown around the edges. Afterward, allow your sugar cookies to cool on the baking sheet for about 5 minutes. And be sure you transfer to a wire rack to cool completely.
For the royal icing
- Place your powdered sugar, meringue powder, and nine tablespoons of water inside a mixing bowl. Then, whisk ingredients at high speed for about a minute and a half to two minutes. With this, make sure to utilize an electric mixer. When you lift the whisk off the icing, the icing should drizzle down. Likewise, it should smooth out for about 5 to 10 seconds.4 cups of powdered sugar, sifted, 3 tbs of meringue powder, 9-10 tbsp of room temped water
- If the icing becomes too thick, be sure to add a tablespoon of water. Make sure to do so until you attain the right consistency. And if your icing is too thin, add more powdered sugar. Then, divide your royal icing into how many colors you want to have. But make sure to leave one part of uncolored icing. Afterward, place your uncolored royal icing inside a piping bag. And your colored icing into different piping bags with a small tip of your choice.4 cups of powdered sugar, sifted, 9-10 tbsp of room temped water, Food coloring of your choice
Cookie assembly
- When your cookies have cooled down, take your uncolored royal icing. After that, pipe a royal icing border around the edges of your cookies. Then, pipe only on completely cooled cookies. The main reason is that warm cookies will make your royal icing messy and runny.
- Fill the border of your cookie with a thin layer of royal icing. Then, peel the photo decal. And be sure to place your photo gently on top of your cookie. Afterward, secure your edible picture by pressing gently.
- After that, be sure to repeat the process in all of your cookies. And be sure you allow them to sit for a little while.
- Take your colored royal icing and pipe a decorative border around the photo in your cookies. Also, the colored icing will resemble a frame for your photo.
- Allow your decorated photo cookies to set. And be sure to leave it uncovered overnight to dry.
- After your cookies have dried completely, place them inside clear cookie bags. And make sure to tie the bag with a ribbon. As always, share and enjoy!

Zarah is an experienced pastry chef whose creations have delighted countless customers. With a passion for baking, Zarah has developed a unique style that combines classic techniques with modern flavors. Her desserts are consistently crafted with the finest ingredients, and her attention to detail is evident in the stunning and delectable results. Zarah has a wealth of experience in the pastry kitchen, and loves to share her knowledge with others. Whether it is teaching a class or creating a custom cake for a special occasion, Zarah is committed to making sure every customer is satisfied.