

Last Updated on March 15, 2023
Celebrate your child’s birthday party and make it special by making one of these adorable bear cake ideas. These cake ideas are super fun! Not only that but also it will guarantee to bring a smile to any child.
Making one of these bear cake ideas
What You Will Need: Bear Cake Ideas Recipe One
Ingredients For The Cake
- 1 1/2 cups of all-purpose flour
- 2/3 cup of natural unsweetened cocoa
- 1 1/2 cups of sugar
- 1 tsp of baking powder
- 1/2 tsp of salt
- 2pcs eggs
- 1/2 cup of vegetable oil
- 2 tsp of vanilla
- 1 1/4 tsp of baking soda
- 3/4 cup of milk
- 2/3 cup of hot water
For The Special Buttercream Frosting
- 2 cups of vegetable shortening
- 8 cups of powdered sugar
- ½ tsp of salt
- 2 tsp of clear vanilla extract
- 6 ounces of heavy cream
Equipment
- Mixing bowls
- A piece of a 6-inch round cake pan
- A piece of a 5-inch round cake pan
- Cupcake pan (6 pcs cupcake pan)
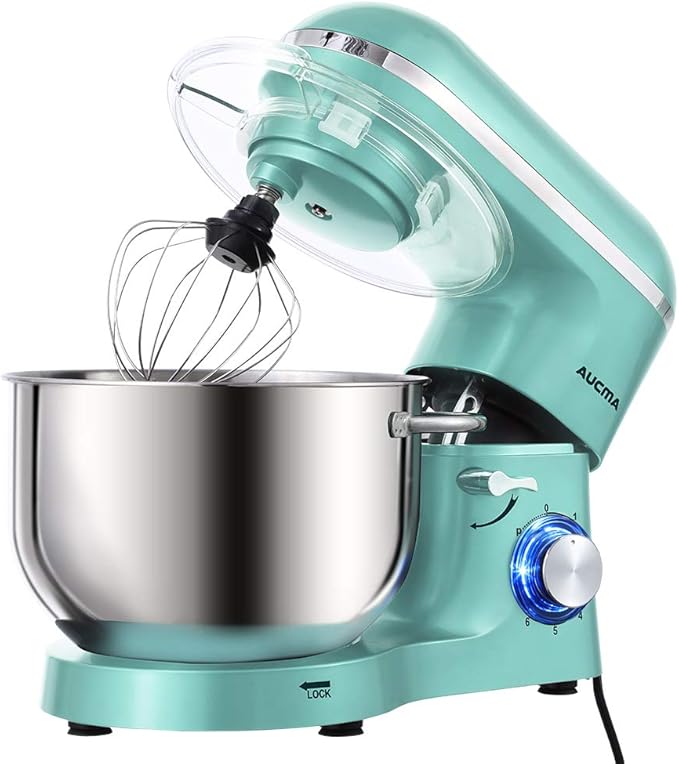
- Electric mixer
- Rubber spatula
- Offset spatula
- Parchment paper
- Wire rack
- Knife
- Round cutter
Aucma Stand Mixer,6.5-QT 660W 6-Speed Tilt-Head Food Mixer, Dough Hook, Wire Whip & Beater
Step-by-Step Instructions
For The Cake
Step 1
Preheat your oven to 350 degrees Fahrenheit.
Step 2
After that, grease the bottom of your pans( 6″, 5″, and cupcake pan) using vegetable shortening. Then, put a parchment paper. And lightly dust each pan with cocoa powder. Afterward, set aside.
Step 3
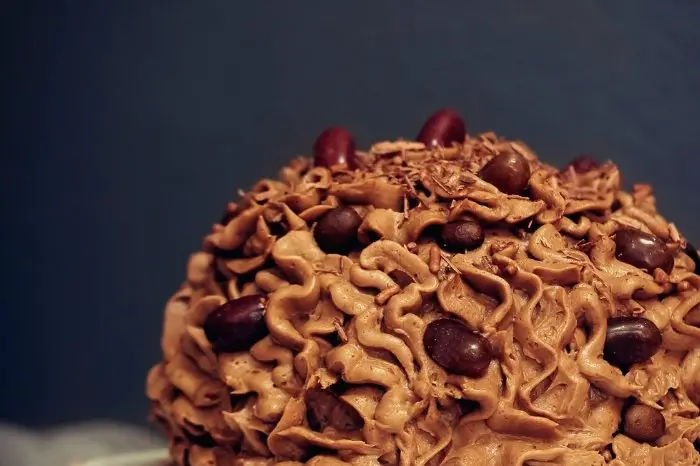
Then, using a large mixing bowl, sift the dry ingredients together and whisk to combine. Afterward, add the eggs, milk, oil, and vanilla. After that, beat using an electric mixer for 2 minutes until everything combines well. Do not forget to scrape the bowl’s sides using a rubber spatula. And then, add the hot water and mix again until all the ingredients incorporate completely.
Step 4
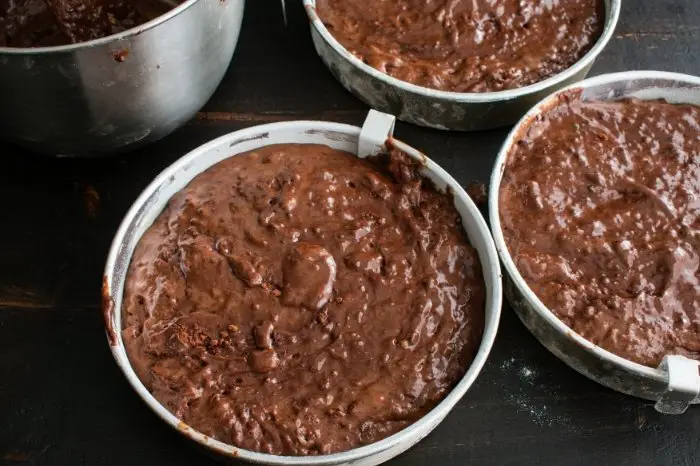
Afterward, pour the chocolate cake batter into the prepared pans and bake it for 28 to 30 minutes.
Step 5
Then, cool the cakes once they cook for about 5 minutes in the pan. Next, transfer them to the wire racks to cool completely.
For The Buttercream
Step 1
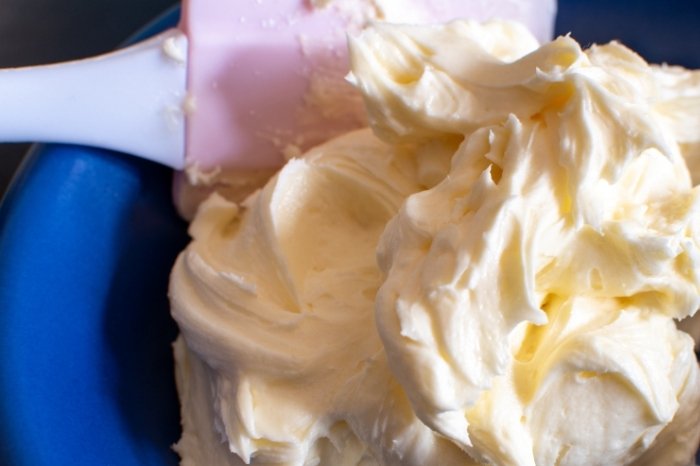
Before anything else, cream the vegetable shortening until it becomes light and fluffy. Then gradually add the powdered sugar and continue creaming until the mixture blends well.
Step 2
Afterward, add the salt, vanilla, and whipping cream. Then, blend at low speed until moistened. After that, add the additional whipping cream if necessary (up to 2 ounces). Make sure to beat the mixture at high speed until the frosting is fluffy.
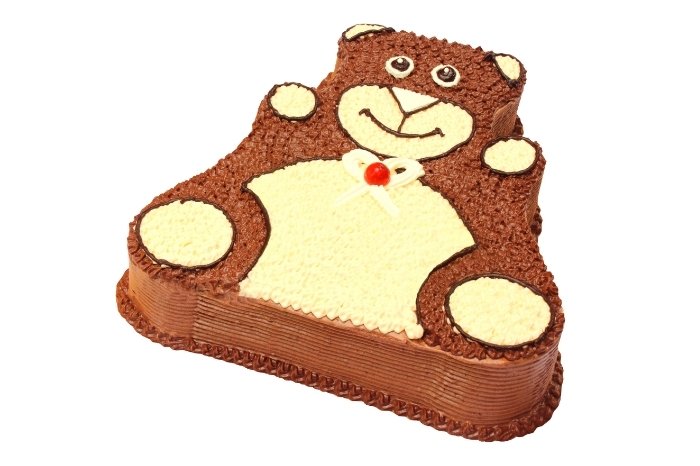
Cake Assembly – Teddy Bear Birthday Cakes
Step 1
First and foremost, prepare your cooled cakes. With that, one 6-inch layer, one 5-inch cake layer, and six cupcakes.
Step 2
After that, take your buttercream frosting and make another batch. Then, add 1/3 of a cup of unsweetened cocoa to the powdered sugar to make a chocolate frosting.
Step 3
Afterward, color a small amount from the batch of buttercream with pink icing color for the teddy bear’s cheeks. Also, include another small amount with blue for the bowtie. And then save a little of the buttercream for the teddy bear’s eyes.
Step 4
Then, use the remaining buttercream and add a small amount of chocolate buttercream. Do this to make a light brown color to make the frosting for the belly, nose, paws, and ears.
Step 5
To create the bear shape, use a sharp knife to remove a small curved portion from the 6-inch cake layer. With that, save the curved cake scraps for later.
Step 6
Afterward, attach the 5″ and 6″ cake layers to form the head and body. Then, place them on a large rectangular cake board. Because of that, you can use a baking sheet if the cake board is unavailable.
Step 7
After that, frost an area for the cheeks using pink buttercream. Also, ensure to frost the bear’s belly area with light brown buttercream. Keep in mind to even out the frosting with an offset spatula. Then, cover a large area so you can make the belly and cheeks. With this, you can choose any size you want when piping the furry frosting later.
Step 8
Then, using a round cutter, cut the curved sections from two cupcakes. Use them as ears for the teddy bear’s head. Afterward, save the scraps for later.
Step 9
Using the same round cutter, gently press and mark where you want the cheeks to be.
Step 10
Spread a thin layer of chocolate frosting using an offset spatula on the naked parts of the cake. Also, frost two cupcakes.
Step 11
Afterward, use the lighter brown frosting for the cupcake ears. Next, frost the remaining cupcakes for the legs. After that, add more frosting to create a flat and smooth top.
Step 12
To make the bear’s snout, pipe a circular mound of light brown frosting into a wax paper sheet. And use an offset spatula. Do this to smoothen it out. Then, put the frosting mound in the freezer to make it firm. Because of this, you can smoothen it out more using the offset spatula once it firms up.
Step 13
Then, position the firm frosting mound in the bear’s head. And gently tuck two pieces of chocolate buttons underneath to create the eyes.
Step 14
Afterward, place the dark chocolate frosting in a piping bag with an open star tip. Make sure to do this to create the teddy bear’s fur. Ensure to use the round cutter’s impression as a guideline for creating perfectly shaped cheeks.
Step 15
After that, pipe some frosting near the bear’s neck and place two frosted chocolate cupcakes to create the arms. Then, gradually add a small amount of frosting to the bottom of each cake. Do this so that the cakes will not move around and keep the bear’s shape.
Step 16
Then, carve away some of the cake if you want the legs to face upward. Next, attach the frosted cupcakes to the cake to create the legs. Then, you can use a straw to through the cupcakes into the cake to secure it even more.
Step 17
Afterward, pipe frosting around the bear’s body. However, make sure not to include the light brown patches for the ears, belly, and bottom paws.
Step 18
For each paw, place a big chocolate button and three small chocolate buttons facing side down into the frosting.
Step 19
Then, cut one large chocolate button almost in half. After that, position it as a nose, and put a tiny amount of frosting.
Step 20
Afterward, pipe tiny dots on the chocolate button eyes of the reserved buttercream.
Step 21
Color the remaining chocolate frosting with a darker brown and draw or pipe a smile on the bear’s face.
Step 22
Using the cake scraps, create a bowtie and paste it using some frosting. Finally, cover the bowtie with blue buttercream.
Teddy Bear Bday Cakes
Equipment
- Mixing bowls
- A piece of a 6-inch round cake pan
- A piece of a 5-inch round cake pan
- Cupcake pan (6 pcs cupcake pan)
- Parchment paper
- Wire rack
- Knife
- Round cutter
Ingredients
For The Cake
- 1 1/2 cups of all-purpose flour
- 2/3 cup of natural unsweetened cocoa
- 1 1/2 cups of sugar
- 1 tsp of baking powder
- 1/2 tsp of salt
- 2 pcs eggs
- 1/2 cup of vegetable oil
- 2 tsp of vanilla
- 1 1/4 tsp of baking soda
- 3/4 cup of milk
- 2/3 cup of hot water
For The Buttercream Frosting
- 2 cups of vegetable shortening
- 8 cups of powdered sugar
- ½ tsp of salt
- 2 tsp of clear vanilla extract
- 6 ounces of heavy cream
Instructions
For The Cake
- Preheat your oven to 350 degrees Fahrenheit.
- After that, grease the bottom of your pans( 6", 5" and cupcake pan) using vegetable shortening. Then, put a parchment paper. And lightly dust each pan with cocoa powder. Afterward, set aside.
- Then, using a large mixing bowl, sift the dry ingredients together and whisk to combine. Afterward, add the eggs, milk, oil, and vanilla. After that, beat using an electric mixer for 2 minutes until everything combines well. Do not forget to scrape the bowl's sides using a rubber spatula. And then, add the hot water and mix again until all the ingredients incorporate completely.
- Afterward, pour the chocolate cake batter into the prepared pans and bake it for 28 to 30 minutes.
- Then, cool the cakes once they cook for about 5 minutes in the pan. Next, transfer them to the wire racks to cool completely.
For The Buttercream
- Before anything else, cream the vegetable shortening until it becomes light and fluffy. Then gradually add the powdered sugar and continue creaming until the mixture blends well.
- Afterward, add the salt, vanilla, and whipping cream. Then, blend at low speed until moistened. After that, add the additional whipping cream if necessary (up to 2 ounces). Make sure to beat the mixture at high speed until frosting is fluffy.
Cake Assembly
- First and foremost, prepare your cooled cakes. With that, one 6-inch layer, one 5-inch cake layer, and six cupcakes.
- After that, take your buttercream frosting and make another batch. Then, add 1/3 of a cup of unsweetened cocoa to the powdered sugar to make a chocolate frosting.
- Afterward, color a small amount from the batch of buttercream with pink icing color for the teddy bear's cheeks. Also, include another small amount with blue for the bowtie. And then save a little of the buttercream for the teddy bear's eyes.
- Then, use the remaining buttercream and add a small amount of chocolate buttercream. Do this to make a light brown color to make the frosting for the belly, nose, paws, and ears.
- To create the bear shape, use a sharp knife to remove a small curved portion from the 6-inch cake layer. With that, save the curved cake scraps for later.
- Afterward, attach the 5" and 6" cake layers to form the head and body. Then, place them on a large rectangular cake board. Because of that, you can use a baking sheet if the cake board is unavailable.
- After that, frost an area for the cheeks using pink buttercream. Also, ensure to frost the bear's belly area with light brown buttercream. Keep in mind to even out the frosting with an offset spatula. Then, cover a large area so you can make the belly and cheeks. With this, you can choose any size you want when piping the furry frosting later.
- Then, using a round cutter, cut the curved sections from two cupcakes. Use them as ears for the teddy bear's head. Afterward, save the scraps for later.
- Using the same round cutter, gently press and mark where you want the cheeks to be.
- Spread a thin layer of chocolate frosting using an offset spatula on the naked parts of the cake. Also, frost two cupcakes.
- Afterward, use the lighter brown frosting for the cupcake ears. Next, frost the remaining cupcakes for the legs. After that, add more frosting to create a flat and smooth top.
- To make the bear's snout, pipe a circular mound of light brown frosting into a wax paper sheet. And use an offset spatula. Do this to smoothen it out. Then, put the frosting mound in the freezer to make it firm. Because of this, you can smoothen it out more using the offset spatula once it firms up.
- Then, position the firm frosting mound in the bear's head. And gently tuck two pieces of chocolate buttons underneath to create the eyes.
- Afterward, place the dark chocolate frosting in a piping bag with an open star tip. Make sure to do this to create the teddy bear's fur. Ensure to use the round cutter's impression as a guideline for creating perfectly shaped cheeks.
- After that, pipe some frosting near the bear's neck and place two frosted chocolate cupcakes to create the arms. Then, gradually add a small amount of frosting to the bottom of each cake. Do this so that the cakes will not move around and keep the bear's shape.
- Then, carve away some of the cake if you want the legs to face upward. Next, attach the frosted cupcakes to the cake to create the legs. Then, you can use a straw through the cupcakes into the cake to secure it even more.
- Afterward, pipe frosting around the bear's body. However, make sure not to include the light brown patches for the ears, belly, and bottom paws.
- For each paw, place a big chocolate button and three small chocolate buttons facing side down into the frosting.
- Then, cut one large chocolate button almost in half. After that, position it as a nose, and put a tiny amount of frosting.
- Afterward, pipe tiny dots on the chocolate button eyes of the reserved buttercream.
- Color the remaining chocolate frosting with a darker brown and draw or pipe a smile on the bear's face.
- Using the cake scraps, create a bowtie and paste it using some frosting. Finally, cover the bowtie with blue buttercream.
Girly Teddy Bear Birthday Cake
If you are looking for cute bear cake ideas for a little girl’s birthday, this girly teddy bear birthday cake is a great option. By using a bear cake mold, you can easily create an adorable bear cake that you can then decorate.
What You Will Need: Bear Cake Ideas Recipe Two
Ingredients
For the cake:
- One box of vanilla cake mix
- 1 cup water
- 3 eggs
- 1/2 cup vegetable oil
For the frosting:
- 3 cups confectioners’ sugar
- 1 cup butter
- 1 teaspoon vanilla extract
- 1 to 2 tablespoons whipping cream or milk
- Pink food coloring
Equipment
- Large mixing bowl
- Medium mixing bowl
- Whisk
- Bear cake pan
- Cooking spray
- Electric mixer
- Rubber spatula
- Wire rack
- Frosting bag and piping tips
Step-by-Step Instructions
Step One: Preheat the Oven and Prepare the Bear Cake Pan
Preheat the oven to 350 degrees Fahrenheit and grease the bear cake pan with cooking spray.
Step Two: Prepare Cake Batter
In a medium mixing bowl, combine the cake mix with the water, eggs, and oil. Use an electric mixer to beat the cake mix for two minutes at medium speed.
Step Three: Bake the Cake
Pour the cake into the bear cake pan and bake for 38 to 43 minutes. Allow the cake to cool for 10 minutes on a wire rack before inverting the cake and removing it from the pan.
Step Four: Make the Frosting
In a large bowl, mix the butter and sugar on low speed until combined, and then turn the speed to medium and beat for another three minutes. Next, add the whipping cream or the milk and beat for one minute then stir in the pink food coloring, and add it until you reach your desired shade.
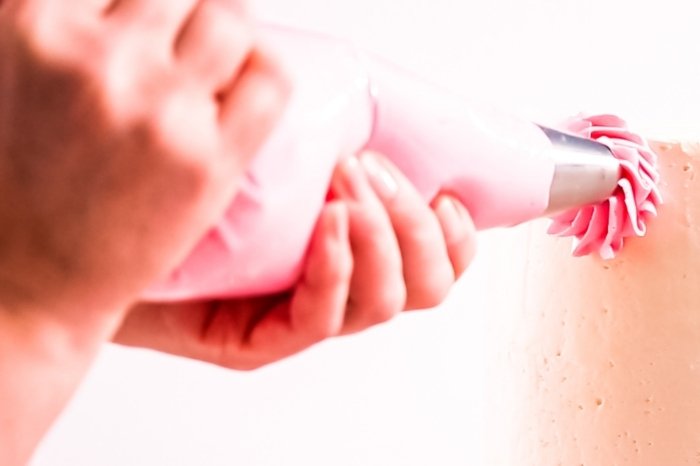
Step Five: Decorate the Cake
Once the cake has cooled, fill a piping bag with the pink frosting and add your tip of choice. Decorate the bear cake with pink frosting. Alternatively, use chocolate frosting to decorate the bear cake and pipe a pink bow.
Tips and Tricks
Store any leftover cake at room temperature for one to two days or in the fridge for up to five days. Be sure to store your cake in an airtight container to maximize freshness.
Due to the shapes of these bear cakes, they may be tricky to freeze. However, if you do want to freeze either one of these recipes, place them in the freezer for one hour to let the frosting set. Wrap the cakes in plastic wrap and then a layer of aluminum foil.
Return the cakes to the freezer and store them for up to three to six months. When ready to eat, allow your bear cake to thaw in the fridge overnight.
Servings and Preparation Time
For the First Cake:
|
Bake Time |
Preparation Time |
Servings |
|
28-30 minutes |
1 hour 30 minutes |
16-20 |
For the second cake:
|
Bake Time |
Preparation Time |
Servings |
|
38-43 minutes |
40 minutes |
16-18 |
Additional Bear Cake Ideas
The recipe above is great for birthdays for any little kid. It is adorable and though there are lots of steps, it is fun to make. However, there are several other great bear cake ideas you can also make.
Teddy Bear Cake Decorations
If you don’t have much of an artistic side, you can buy teddy bear cake decorations to make a bear cake. There are plenty of adorable bear cake decorations available such as this adorable 3D bear cake topper that comes in a variety of colors. You can also use this adorable edible bear decoration kit to transform your round cake into a bear’s face.
For a baby shower bear cake, you can use this cute bear cake topper that shows your excitement for the baby that is on its way. This will save you time decorating but will make for a memorable cake.
The Best Bear Cake Ideas for Your Next Party
These adorable bear cake ideas are great for any kid’s birthday party you are planning. Not only do they taste great, but they are also cute and will make a show-stopper dessert at any party. You will want to keep these bear cake ideas on hand to make for your favorite kiddos.

Zarah is an experienced pastry chef whose creations have delighted countless customers. With a passion for baking, Zarah has developed a unique style that combines classic techniques with modern flavors. Her desserts are consistently crafted with the finest ingredients, and her attention to detail is evident in the stunning and delectable results. Zarah has a wealth of experience in the pastry kitchen, and loves to share her knowledge with others. Whether it is teaching a class or creating a custom cake for a special occasion, Zarah is committed to making sure every customer is satisfied.