
Last Updated on January 3, 2023
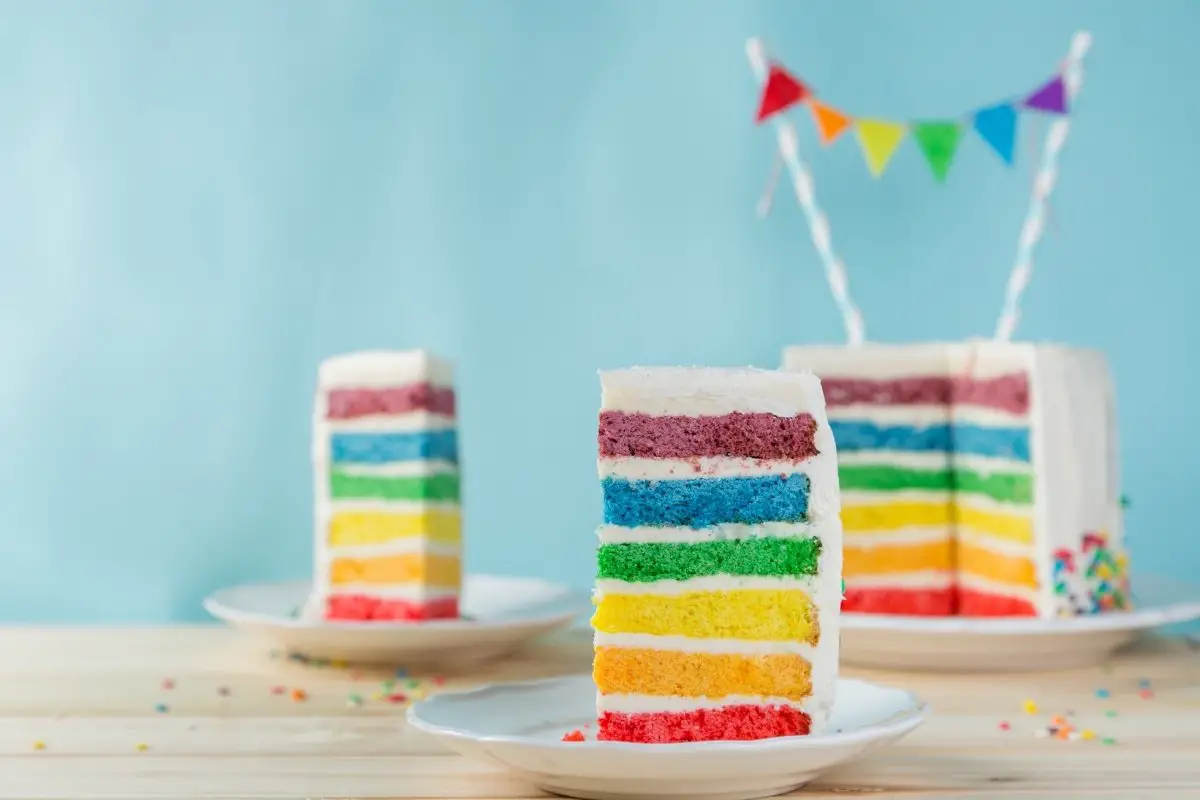
A birthday is a special day. And making a cake will surely make a celebrant feel loved. There are different rainbow cake ideas for birthdays. However, this drip rainbow birthday cake is the best for me. Slicing into the cake to see the amazing colorful layers will surely make the celebrant feel special and loved. Try making this at home.
What You Will Need
Ingredients For The Cake
- 680 grams of cake flour
- 680 grams of granulated sugar
- 1 tsp of salt
- 2 tbsp of baking powder
- 1 tsp of baking soda
- 283 grams of room tempered egg whites
- 170 ml of vegetable oil
- 510 grams of room tempered or slightly warm buttermilk
- 340 grams of softened unsalted butter
- 1 tbsp of vanilla extract
- Gel food coloring (Electric purple, blue, green, yellow, orange, and pink)
For The Buttercream Frosting
- 227 grams of pasteurized egg whites
- 907 grams of powdered sugar
- 907 grams of softened unsalted butter (not melted)
- 2 tsp of vanilla extract
- 1/2 teaspoon of salt
- A dot of purple food coloring (to make the buttercream white)
For The Gold Drip
- 142 grams of white candy melts
- 28 grams of chocolate candy melts
- 170 ml of warm milk
- 1 tsp of super gold dust/luster
- 1/4 teaspoon of vodka, Everclear, or lemon extract
Equipment For Rainbow Party Cakes
- Mixing bowls
- 6pcs of 8″x2″ round cake pans
- Food scale
- Rubber spatula
- Measuring spoons
- Electric mixer
- Whisk attachment
- Paddle attachment
- Turntable
- Offset spatula
- Bench scraper
- Piping bag
- Piping tip (large open star tip)
74 PCs Piping Bags and Tips-48 Numbered Piping Tips & Pastry bags with Pattern Chart & EBook

Step by Step Instructions
For The Rainbow Theme Cake
Step 1
Preheat your oven to 335 °F or 168 °C and prepare your round cake pans and grease. Then, put a round parchment paper at the bottom of each pan.
Step 2
After that, combine your buttermilk with the oil in a mixing bowl and set it aside.
In a different bowl, combine the remaining buttermilk, egg whites, and vanilla. Then, whisk to break up the eggs. After that, set it aside.
Step 3
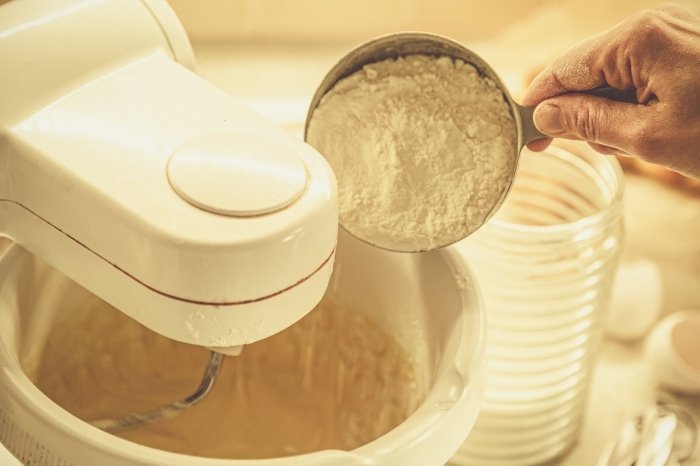
Next, use an electric mixer attached with a paddle attachment. And combine the flour, sugar, baking powder, baking soda, and salt for ten seconds.
Step 4
Then, put the softened butter into the dry ingredients. And mix at a low speed for thirty seconds until the mixture has a coarse sand texture.
Step 5
After that, add the milk and oil mixture. Mix until the dry ingredients are moist. Then, set the speed of your mixer to medium. And mix for a full two minutes.
Step 6
Scrape the bowl using a rubber spatula. And reduce the speed to low. Next, add the egg white mixture in three batches. Then, mix the batter for 15 seconds between each addition. After that, scrape the bowl’s sides to incorporate everything.
Step 7
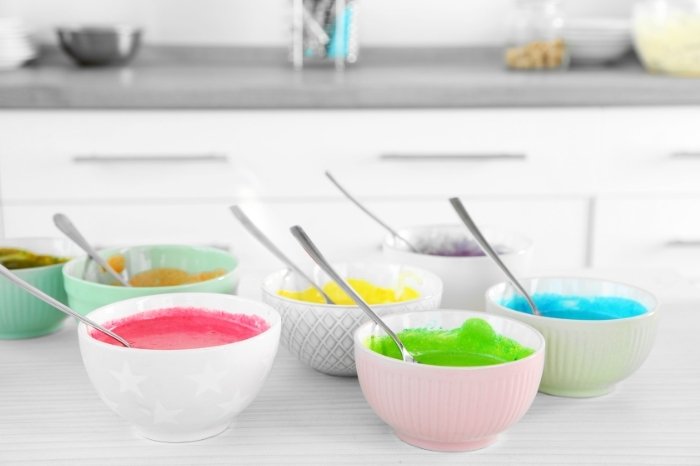
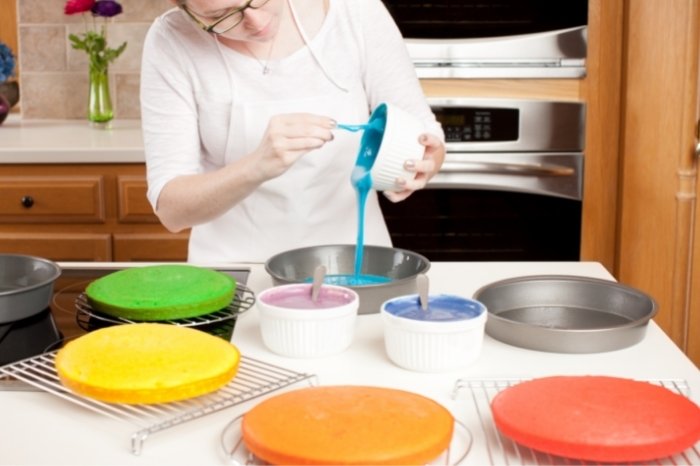
Divide the cake batter into six bowls, about 15 ounces each bowl. Afterward, color the batter in each bowl with the color you have chosen. Remember, 1/4 tsp for pink, 1/2 tsp for yellow, and 1/4 tsp+1/2 tsp green for green. In addition to that, it is 1/2 tsp for blue and 1/4 tsp+1/2 tsp for purple.
Step 8
After that, bake your cakes for 20 to 24 minutes. Or make sure to bake until the edges start to separate from the cake pan. Because of this, do not underbake your cakes.
Step 9
Afterward, instantly tap the pan firmly on the countertop once to release the steam from the cake. Hence, this trick will stop the cake from shrinking.
Step 10
Finally, allow the cakes to cool for 10 minutes in the pan before turning it over. Make sure to chill your cakes before trimming.
For The Buttercream
Step 1
Combine powdered sugar and pasteurized egg whites in a bowl. And mix using an electric mixer attached with a whisk attachment. Mix on low speed to incorporate. And then increase the speed to high.
Step 2
After that, add the butter gradually, continue to mix until you added all the butter. Then, add in the vanilla and salt. After that, set your mixer on high until the mixture becomes light and fluffy. Afterward, add a dot of purple food coloring to cancel the yellow on the buttercream.
Step 3
Lastly, change the whisk attachment with a paddle attachment of your mixer. Doing this removes the bubbles from the buttercream; mix on low for 10 minutes.
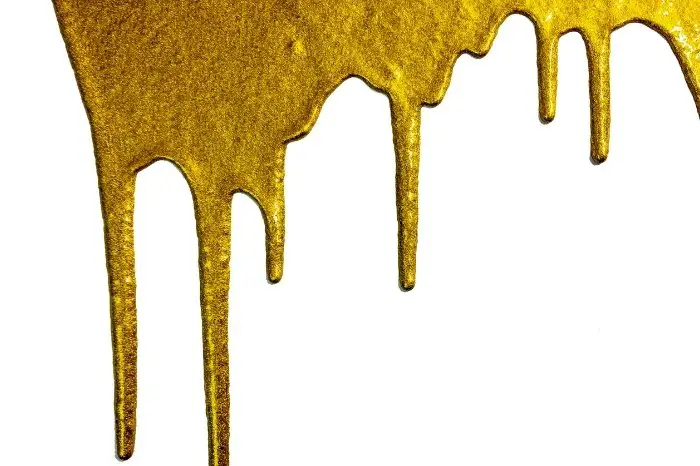
For The Gold Drip
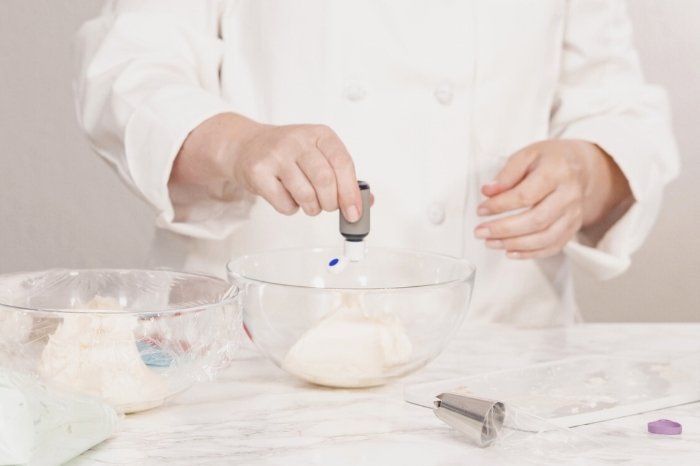
Step 1
Melt the chocolate in the microwave using 15-second increments. Then, add the warm milk. And microwave for another 15 seconds.
Step 2
After that, stir the mixture until smooth. Make sure to add the yellow food coloring. Then, stir again. Finally, put the ganache into a piping bag.
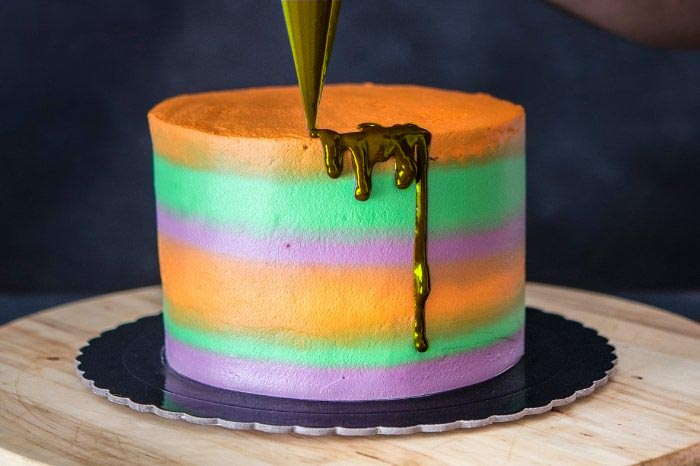
Rainbow Cake Ideas For Birthdays: Cake Assembly And Design
Stack your cake layers. Then, arrange them like a rainbow and crumb coat your cake with a thin layer of frosting.
Frost your cake. Ensure to smoothen it out using a bench scraper. Or a long offset spatula. Put the frosted cake into the refrigerator or chiller.
-
For The Drip Rainbow Cake Design
Step 1
Take your chilled and frosted cake and place it in a turntable. Snip off the tip of your piping bag filled with ganache and drip the edges of the cake.
Step 2
Once the drip sets, mix the gold dust and vodka in a bowl. Then, paint the drip with gold using a small paintbrush. After that, let it set. You can add some buttercream rosettes swirls on top of the cake and add sprinkles with a pipe.
-
For The Colorful Rosettes Rainbow Cake Design
Step 1
First and foremost, make some buttercream frosting. And divide it into six bowls. Then, color the frosting in each bowl with the colors of your choice. After that, place each colored frosting in separate piping bags.
Afterward, take your chilled and frosted cake. Then, please place it in a turntable.
Step 2
Next, pipe rosettes around your cake, starting at the bottom part of your cake. For that reason, you can alternate the color of each rosette. Or you can line rosettes, creating a rainbow. Then, cover the top of your rainbow cake with colored buttercream rosettes as well.
-
For the Simple Rainbow Cake Design
Step 1
Prepare some colored(rainbow) buttercream. Please place them in different piping bags. Then, take your chilled and frosted cake. After that, please place it in a turntable.
Afterward, different pipe colors of rosette swirl on top your the cake using a large open star tip.
Step 2
Lastly, add some colorful sprinkles.
Tips and Tricks For Rainbow Themed Birthday Cakes
Essentially, place your ingredients to room temperature to ensure that the batter will not curdle and break. Also, it would help to use a scale to measure your ingredients. Because weighing your ingredients is accurate than using cups, thus giving you a better result. Furthermore, measure and weigh your ingredients ahead of time to decrease the possibility of forgetting an ingredient. In addition to that, allow your cakes to chill before stacking and frosting.
Remember, white velvet cake is best for this recipe. Also, it is very white to add the colors you want for the rainbow layers easily. Additionally, adding colors to a cake with egg yolks will change your colors while baking. Finally, keep in mind that white velvet cake will not go over mix when adding your color.
Read more about A Comprehensive Costco Birthday Cake Review – 2 Options
Rainbow Cake Ideas For Birthdays
Equipment
- Mixing bowls
- 6pcs of 8"x2" round cake pans
- Food scale
- Measuring Spoons
- Paddle attachment
- Turntable
- Bench scraper
- Piping Bag
- Piping tip (large open star tip)
Ingredients
For The Cake
- 680 grams of cake flour
- 680 grams of granulated sugar
- 1 tsp of salt
- 2 tbsp of baking powder
- 1 tsp of baking soda
- 283 grams of room tempered egg whites
- 170 grams of vegetable oil
- 510 grams of room tempered or slightly warm buttermilk
- 340 grams of softened unsalted butter
- 1 tbsp of vanilla extract
- Gel food coloring Electric purple, blue, green, yellow, orange, and pink
For The Buttercream Frosting
- 227 grams of pasteurized egg whites
- 907 grams of powdered sugar
- 907 grams of softened unsalted butter not melted
- 2 tsp of vanilla extract
- 1/2 teaspoon of salt
- A dot of purple food coloring to make the buttercream white
For The Gold Drip
- 142 grams of white candy melts
- 28 grams of chocolate candy melts
- 170 grams of warm milk
- 1 tsp of super gold dust/luster
- 1/4 teaspoon of vodka Everclear, or lemon extract
Instructions
For The Rainbow Theme Cake
- Preheat your oven to 335 °F or 168 °C and prepare your round cake pans and grease. Then, put a round parchment paper at the bottom of each pan.
- After that, combine your buttermilk with the oil in a mixing bowl and set it aside.
- In a different bowl, combine the remaining buttermilk, egg whites, and vanilla. Then, whisk to break up the eggs. After that, set it aside.
- Next, use an electric mixer attached with a paddle attachment. And combine the flour, sugar, baking powder, baking soda, and salt for ten seconds.
- Then, put the softened butter into the dry ingredients. And mix at a low speed for thirty seconds until the mixture has a coarse sand texture.
- After that, add the milk and oil mixture. Mix until the dry ingredients are moist. Then, set the speed of your mixer to medium. And mix for a full two minutes.
- Scrape the bowl using a rubber spatula. And reduce the speed to low. Next, add the egg white mixture in three batches. Then, mix the batter for 15 seconds between each addition. After that, scrape the bowl's sides to incorporate everything.
- Divide the cake batter into six bowls, about 15 ounces each bowl. Afterward, color the batter in each bowl with the color you have chosen. Remember, 1/4 tsp for pink, 1/2 tsp for yellow, and 1/4 tsp+1/2 tsp green for green. In addition to that, it is 1/2 tsp for blue and 1/4 tsp+1/2 tsp for purple.
- After that, bake your cakes for 20 to 24 minutes. Or make sure to bake until the edges start to separate from the cake pan. Because of this, do not underbake your cakes.
- Afterward, instantly tap the pan firmly on the countertop once to release the steam from the cake. Hence, this trick will stop the cake from shrinking.
- Finally, allow the cakes to cool for 10 minutes in the pan before turning it over. Make sure to chill your cakes before trimming.
For The Buttercream
- Combine powdered sugar and pasteurized egg whites in a bowl. And mix using an electric mixer attached with a whisk attachment. Mix on low speed to incorporate. And then increase the speed to high.
- After that, add the butter gradually, continue to mix until you added all the butter. Then, add in the vanilla and salt. After that, set your mixer on high until the mixture becomes light and fluffy. Afterward, add a dot of purple food coloring to cancel the yellow on the buttercream.
- Lastly, change the whisk attachment with a paddle attachment of your mixer. Doing this removes the bubbles from the buttercream; mix on low for 10 minutes.
For The Gold Drip
- Melt the chocolate in the microwave using 15-second increments. Then, add the warm milk. And microwave for another 15 seconds.
- After that, stir the mixture until smooth. Make sure to add the yellow food coloring. Then, stir again. Finally, put the ganache into a piping bag.
Notes

Zarah is an experienced pastry chef whose creations have delighted countless customers. With a passion for baking, Zarah has developed a unique style that combines classic techniques with modern flavors. Her desserts are consistently crafted with the finest ingredients, and her attention to detail is evident in the stunning and delectable results. Zarah has a wealth of experience in the pastry kitchen, and loves to share her knowledge with others. Whether it is teaching a class or creating a custom cake for a special occasion, Zarah is committed to making sure every customer is satisfied.