
Last Updated on March 8, 2023
If you do not have multiple cake pans, you will want to know how to make a double-layer cake with one pan. Whether for a birthday or holiday celebration, cakes for a great dessert to serve. Many people choose to make a layer cake with filling to make it even more special.
The great thing about layer cakes and you can fill them with frosting, custard, jam, ganache, or whipped topping. It gives you the possibility to be as creative as you like with the flavor combinations. Fortunately, you can still make a layer cake even if you only have one pan and the process requires no prior baking experience.
Without further ado, here is all you need to know about how to make a double-layer cake with one pan.
What You Will Need For How to Make a Double Layer Cake With One Pan
To make this rectangle chocolate layer cake, you will need:
Ingredients
- 1/2 cup cocoa powder
- 1 cup hot coffee
- 2 sticks of unsalted butter, at room temperature
- 2 cups granulated sugar
- 5 eggs
- 2 teaspoons vanilla extract
- 1 1/2 teaspoons baking soda
- 1 tablespoon baking powder
- 4 cups all-purpose flour
- 1 teaspoon salt
- 1 cup whole milk
Filling and frosting
- 2 cups heavy cream
- 1/2 cup confectioners’ sugar
- 1 teaspoon vanilla extract
- 1 1/2 cups almonds, sliced and toasted
- 1/3 cup dark chocolate, melted
- Raspberries for decoration
Equipment
- 13 x 18-inch pan (half sheet)
- Cooking Spray
- Parchment paper
- Sifter
- Whisk
- Large mixing bowl
- Electric mixer
- Small bowl
- Medium bowl
- Wire rack
- Offset spatula
Step-by-step instructions
Step one: Prepare your half-sheet pan and preheat the oven
Preheat the oven to 350 degrees Fahrenheit and grease your half-sheet pan. Then, add a layer of parchment paper and grease again.
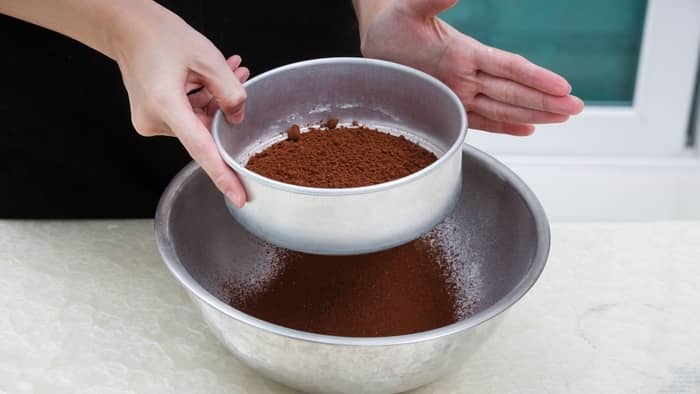
Step two: Sift the cocoa powder and mix it with the coffee
Using your sifter, sift the cocoa powder into a small bowl and then add your hot coffee. Whisk the cocoa and coffee together until they are smooth and set aside.
Step three: Cream butter and sugar
Add your butter and sugar together into a large bowl and cream together with an electric mixer. Beat it together for four to five minutes, until it is light and fluffy.
Step four: Add eggs and vanilla
Add the eggs to the creamed butter and sugar one at a time, beating after each addition. Then, add in the vanilla and mix until just combined, scraping down the sides of the bowl as needed.
Step five: Mix together dry ingredients
In a medium bowl, use a whisk to mix together the all-purpose flour, baking powder, baking soda, and salt.
Step six: Combine milk and cocoa powder mixture
Whisk the milk and the cocoa powder mixture together until smooth.
Step seven: Combine the wet and dry ingredients
Add 1/3 of the dry ingredients into the wet ingredients and mix well. Then, add half of the milk and cocoa mixture into the batter and combine. Repeat the alternating steps until the batter is fully combined.
Step eight: Bake the cake
Pour your cake batter into the prepared cake pan and bake for 25-30 minutes, or until a toothpick inserted into the middle comes out clean. Allow yourself-sheet cake to cool on a wire rack while in the pan. While it is still warm, run an offset spatula around the edge to loosen it.
Step nine: Make the frosting
In a large bowl with an electric mixer, add the heavy cream and confectioners’ sugar. Beat together until soft peaks form and then add in the vanilla extract. Cover your bowl in plastic wrap and store the whipped cream frosting in your fridge as you work on the cake.
Step ten: Cut your cake
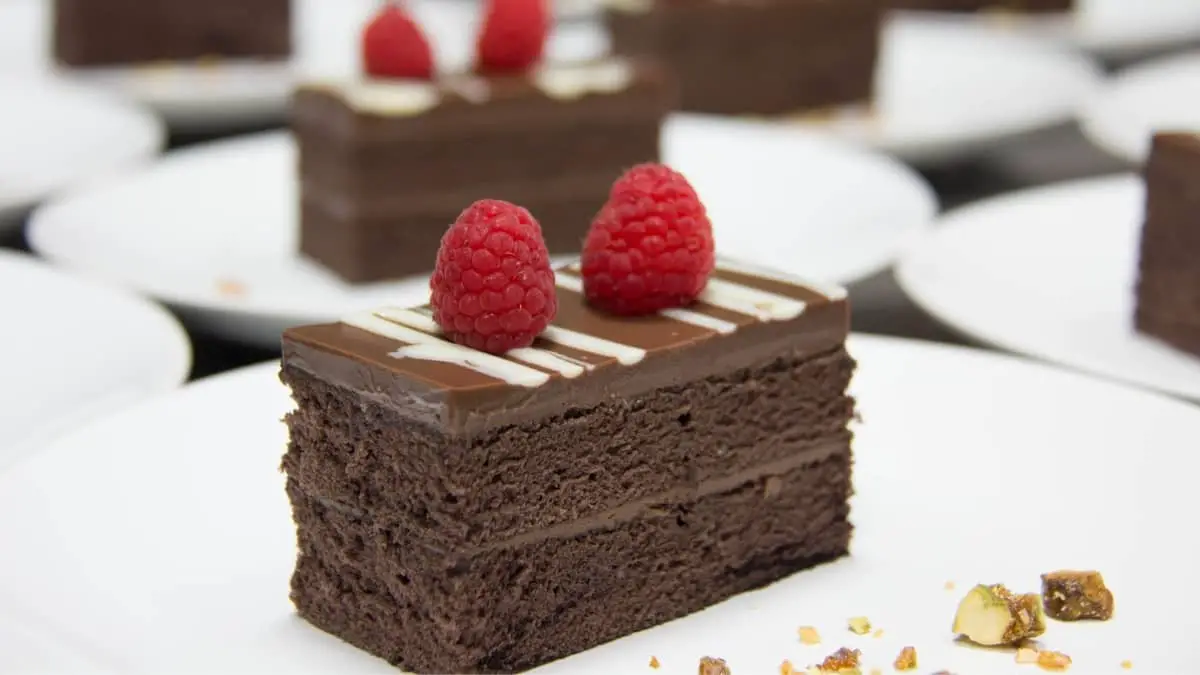
Carefully remove your cake from the pan and cut it in half with a serrated knife to make two pieces that measure 13 x9 inches.
Step eleven: Assemble the cake
Place one layer of the cake on a plate or tray and add a layer of frosting. Then, carefully add the second cake layer to the top of the frosting. Apply a thin layer of frosting to the outside of the cake to create a crumb coat and place it in the fridge for 15-30 minutes.
After it has been in the fridge, finish frosting your cake. Then, decorate it with almonds, and raspberries and drizzle it with melted dark chocolate.
Tips and Tricks
When not serving this cake, you should place it in the fridge since it contains whipped cream frosting. It can last three to four days in an airtight container in the fridge.
In addition, you can also freeze this layer cake as well. First, place it in the fridge uncovered for an hour so the frosting can set. Then, cover it with a layer of plastic wrap followed by a layer of aluminum foil. Return the covered cake to the freezer and store it in there for up to six months.
When ready to serve, let your cake thaw in the fridge overnight or on the counter at room temperature for one to two hours. Store any leftovers in the fridge when you are not serving.
You can also use your favorite half-sheet cake recipe to make a layer cake. Simply follow all of the instructions and then once it is cool, cut it to create two 13 x 9-inch pieces and then layer them and decorate. You can also experiment with the sizes you cut if you want to make a square-layer cake.
In addition, you can also convert a sheet cake into a layer cake. Simply bake your sheet cake, which is 18 x24 inches, as instructed,d and once it is cool, cut it into two pieces that are 18 12 inches. Add a layer of frosting to one cake layer then top it with the second cake layer and decorate.
Mrs. Anderson’s Baking Half Sheet Pan, 13-Inches x 18-Inches

Servings and Preparation Size: How to Make a Double Layer Cake With One Pan
|
Bake Time |
Preparation Time | Servings |
| 25-30 minutes | 30 minutes |
20-24 |
How to Make a Double Layer Cake With One Pan Using a Round Pan
While this recipe shows you how to make a double-layer cake with one pan using a rectangular pan, you can also use a round pan. Most often, round cakes consist of two, three, or four layers. They come in a variety of different sizes including 6-inch, 8-inch, 9-inch, 10-inch, and 12-inch.
If you only have one round pan, you can use it to make a double-layer round cake with the right steps. To begin, prepare your cake recipe according to the recipe you are using. Ideally, use a recipe that is for just one layer.
Bake your cake according to the instructions and then allow it to fully cool on a wire rack. Once cool, cut your cake in half using a serrated knife or a cake leveler. Then, add your filling to your cake and decorate as desired.
If your recipe is for an atwo-layerr cake, you can bake the layers in batches. After the first cake is cool and the pan is no longer hot, add the batter for the second cake and bake. While the first cake is baking keep the remainder of the batter in the fridge.
You can also add all of the cake batters to your cake pan and bake at once, then cut the cake in half once it is cool. For this method, you will have to increase the baking time on your cake by 15 to 20 minutes. The exact time will vary by the recipe you are making.
How to Layer a Cake Evenly
The best way to layer your cake evenly is to use a cake leveler. A cake leveler is essential an adjustable wire with a handle that allows you to evenly cut your cake in half or to level the top.
You can adjust your cake leveler to different heights to allow you to cut your cake wherever you like. It provides an even, clean cut in your cake.
Instead of a cake leveler, you can also use a serrated knife to cut your cake in half, though this can be a bit tricky and you may not always get a clean, even cut. A serrated knife is the best type of knife to cut through cakes as it will provide the cleanest cut. Many knife sets will include a serrated knife in the set.
Layered Cake Pans
If you plan on making a cake with several layers, it is a good idea to buy a set of cake pans. This will make it much easier than trying to use just one pan for multiple layers. Layered cake pans are a great option to buy for making a cake with several layers.
A layered cake pan set typically comes with five to six round cake pans of the same size. The layered cake pans are typically shallower than traditional cake pans which is ideal for making a layered cake. They are easy to use and help ensure an even bake for a delicious cake.
Tasty and Easy: How to Make a Double Layer Cake With One Pan
This delicious layer cake is simple to make, as you only need one half-sheet pan. It has an elegant look, which is great for serving at parties or formal events.
Did you enjoy this tutorial on how to make a double-layer cake with one pan? If so, please share this layer cake recipe with your friends and family as well.
How to Make a Layer Cake With One Pan
Equipment
- 13 x 18-inch pan (half sheet)
- Cooking spray
- Parchment paper
- Sifter
- Large mixing bowl
- Small bowl
- Medium bowl
- Wire rack
Ingredients
- 1/2 cup cocoa powder
- 1 cup hot coffee
- 2 sticks unsalted butter, at room temperature
- 2 cups granulated sugar
- 5 eggs
- 2 teaspoons vanilla extract
- 1 1/2 teaspoons baking soda
- 1 tablespoon baking powder
- 4 cups all-purpose flour
- 1 teaspoon salt
- 1 cup whole milk
Filling and frosting
- 2 cups heavy cream
- 1/2 cup confectioners' sugar
- 1 tsp vanilla extract
- 1 1/2 cups cups almonds, sliced and toasted
- 1/3 cup cup dark chocolate, melted
- Raspberries for decoration
Instructions
- Prepare your half sheet pan and preheat the oven.Preheat the oven to 350 degrees Fahrenheit and grease your half sheet pan. Then, add a layer of parchment paper and grease again.
- Sift the cocoa powder and mix it with the coffee.Using your sifter, sift the cocoa powder into a small bowl and then add your hot coffee. Whisk the cocoa and coffee together until they are smooth and set aside.
- Cream butter and sugar.Add your butter and sugar together into a large bowl and cream together with an electric mixer. Beat it together for four to five minutes, until it is light and fluffy.
- Add eggs and vanilla.Add the eggs into the creamed butter and sugar one at a time, beating after each addition. Then, add in the vanilla and mix until just combined, scraping down the sides of the bowl as needed.
- Mix together dry ingredients.In a medium bowl, use a whisk to mix together the all-purpose flour, baking powder, baking soda, and salt.
- Combine milk and cocoa powder mixture.Whisk the milk and the cocoa powder mixture together until smooth.
- Combine the wet and dry ingredients. Add 1/3 of the dry ingredients into the wet ingredients and mix well. Then, add half of the milk and cocoa mixture into the batter and combine. Repeat the alternating steps until the batter is fully combined.
- Bake the cake.Pour your cake batter into the prepared cake pan and bake for 25-30 minutes, or until a toothpick inserted into the middle comes out clean. Allow your half sheet cake to cool on a wire rack while in the pan. While it is still warm, run an offset spatula around the edge to loosen it.
- Make the frosting.In a large bowl with an electric mixer, add the heavy cream and confectioners' sugar. Beat together until soft peaks form and then add in the vanilla extract. Cover your bowl in plastic wrap and store the whipped cream frosting in your fridge as you work on the cake.
- Cut your cake.Carefully remove your cake from the pan and cut it in half with a serrated knife to make two pieces that measure 13 x 9-inches.
- Assemble the cake.Place one layer of the cake on a plate or tray and add a layer of frosting. Then, carefully add the second cake layer to the top of the frosting. Apply a thin layer of frosting to the outside of the cake to create a crumb coat and place it in the fridge for 15-30 minutes.After it has been in the fridge, finish frosting your cake. Then, decorate with almonds, raspberries and drizzle it with melted dark chocolate.

Ever since she was a young girl, Anna has been a lover of desserts. As an adult, she enjoys
baking a variety of desserts from cakes, cookies, brownies, bread, and more from scratch. She
enjoys sharing her passion for baking with others who also have a sweet tooth. From properly
measuring ingredients to making sure they are the correct temperature, Anna knows the
importance small details can make in baking. She wants to share her experience with others in
hopes they can make the most delicious baked goods. When she’s not busy blogging, Anna
enjoys trying new recipes in the kitchen.