
Last Updated on January 12, 2023
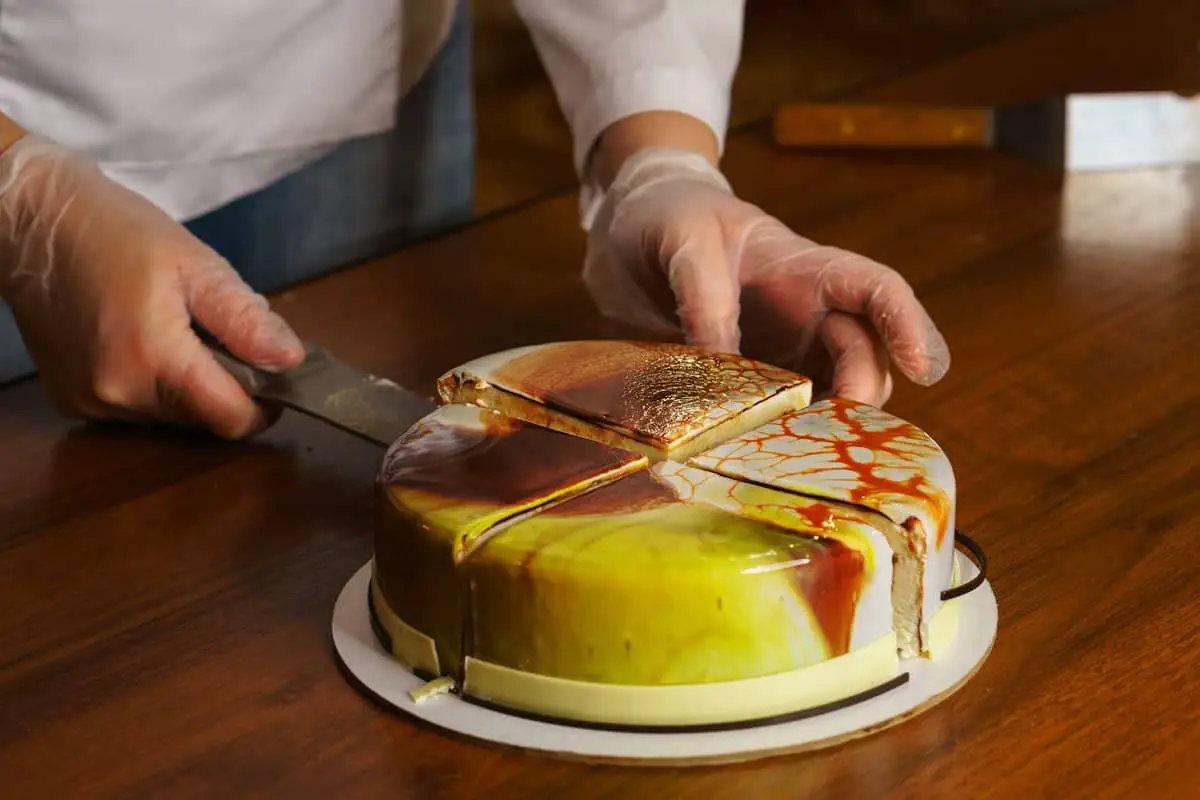
Nowadays, we all use social media as an inspiration to create our own personal masterpieces at home. Although we may not be able to achieve every effect there is out there, there are definitely some we can make in our own kitchen that will surprise our family or guests. One of the last Instagram crazes has been marble cakes. We have tried several ways to make it, and today we bring you how to create a marble effect cake icing on your cakes.
Materials for Marble Cake Icing
You will need buttercream that firms up when cool. The ideal texture is American buttercream, but it may be too sweet for some people, so you can definitely try and use other types of frosting if you so wish. Just remember it needs to hold its own once you are done.
You will also need acetate sheets. These need to be tall enough to go through all the cake in one swipe. This is important because without it the effect would be ruined.

Of course, you will need a crumb-coated cake to use this effect on. Make sure it is the tastiest you have made thus far!
Finally, choose a color to make the marble effect. We suggest you use one color in different shades and intensities, but you can always use as many colors as you like. Use your creativity!
How to Create Marble Effect Using Buttercream Frosting
Step 1
Make sure your cake has been correctly crumb coated and chilled. You will also want to place it over some parchment paper so that if you spill some frosting, it will not go over the beautiful stand.

Step 2
Measure the cake and make sure the acetate sheet you have is big enough to cover the entire surface of the cake. If it is not, then you can always tape two together to make it as tall and big as you need it.
Step 3
Grab your plain buttercream and divide it into four batches. You will want to use food coloring in growing intervals, say 1 drop in the second bowl, 2 in the third, and 3 in the last one. You should go from pure white to intense color.
Step 4
Place the acetate sheet on your working surface (be careful to place the tape toward the table if you had to tape two sheets together). And then, the fun part begins!
Using the frosting, cover the whole surface area of the acetate (leaving some space on the sides for you to hold onto it and place it afterward). Place the frosting with an offset spatula for a better effect.
You can also mix -but not too much!- some of the shades to make it look like marble swirls. You should do this in a bowl before applying the mixture to the acetate.

Step 5
Grab the acetate by the sides you left without buttercream and wrap it around the crumb-coated cake.
To do this, you should start in the middle of the acetate and work your way through to the sides, wrapping it as you go with each end. If you measured correctly, the acetate should be able to cover the entire length of the cake.
Step 6
Smooth it with your hands or a bench scraper to make sure the whole of the icing is touching the cake. If not it will not stick correctly.
Step 7
Place your cake in the freezer for 20 minutes. This will allow the buttercream to harden so that you can scrape off the acetate.
Step 8
Scrape off the acetate carefully. Once you are done, check if there are any holes in the cake. Make sure to patch them up using some extra buttercream. Use a hot spatula or bench scraper while the frosting is still cool to smooth everything out.
Step 9
Afterward, you will want to trim away excess frosting that has gathered at the top of the cake and clean the underside if needed.
Step 10
You can now decorate the top of the cake however you like it! One of our favorites is piping a French tip border all around in either white or the full-on color you chose for your marble effect. It looks so pretty and elegant!
You can also drizzle some ganache and add some sprinkles. Go nuts!
Free-handing Marble Effect Cake Icing
Another way to do this that is a little bit harder is the following. For this technique, you will need an offset spatula.
Step 1
Starting with a crumb-coated, chilled cake, divide the rest of the buttercream into two parts. One will be white and the other will need to be colored in a vibrant tone of your choosing.
Step 2
Cover your cake with a layer of white frosting and then start placing dots of colored buttercream in random spots on top.
Use the offset spatula to blend them into the white buttercream, by doing a back-and-forth motion. Be careful not to overdo it.
You can definitely also use some other tones; maybe doing a middle tone would be a good idea if you have the patience for it. Also, you can add some white frosting onto your spatula to continue blending everything and achieve the final look.
Step 3
Fill a bowl with warm water and place it near you. We will dip the spatula in it to melt the butter in the frosting and sear everything in. It will fix any little hole or crack and will make it look shinier.
Step 4
Now you can get on to trimming and making everything appear neater so that you can decorate the top of your cake. As we said before, you can use whatever technique you like but we think marbled cakes are very elegant and should not be overcrowded.
How To Achieve Stunning Marble Effect Cake Icing: Quick Recipe
Equipment
- Acetate sheets
- Bench scraper
Ingredients
- Buttercream that firms up when cool
- Crumb-coated cake
- Food colors
Instructions
How to Create Marble Effect Using Buttercream Frosting
- Make sure your cake has been correctly crumb coated and chilled. You will also want to place it over some parchment paper so that if you spill some frosting, it will not go over the beautiful stand.
- Measure the cake and make sure the acetate sheet you have is big enough to cover the entire surface of the cake. If it is not, then you can always tape two together to make it as tall and big as you need it.
- Grab your plain buttercream and divide it into four batches. You will want to use food coloring in growing intervals, say 1 drop in the second bowl, 2 in the third and 3 in the last one. You should go from pure white to intense color.
- Place the acetate sheet on your working surface (be careful to place the tape toward the table if you had to tape two sheets together). And then, the fun part begins!
- Using the frosting, cover the whole surface area of the acetate (leaving some space on the sides for you to hold onto it and place it afterward). Place the frosting with an offset spatula for a better effect.
- You can also mix -but not too much!- some of the shades to make it look like marble swirls. You should do this in a bowl before applying the mixture onto the acetate.
- Grab the acetate by the sides you left without buttercream and wrap it around the crumb-coated cake.
- To do this, you should start in the middle of the acetate and work your way through to the sides, wrapping it as you go with each end. If you measured correctly, the acetate should be able to cover the entire length of the cake.
- Smooth it with your hands or a bench scraper to make sure the whole of the icing is touching the cake. If not it will not stick correctly.
- Place your cake in the freezer for 20 minutes. This will allow the buttercream to harden so that you can scrape off the acetate.
- Scrape off the acetate carefully. Once you are done, check if there are any holes in the cake. Make sure to patch them up using some extra buttercream. Use a hot spatula or bench scraper while the frosting is still cool to smooth everything out.
- Afterward, you will want to trim away excess frosting that has gathered at the top of the cake and clean the underside if needed.
- You can now decorate the top of the cake however you like it! One of our favorites is piping a french tip border all around in either white or the full-on color you chose for your marble effect. It looks so pretty and elegant!
- You can also drizzle some ganache and add some sprinkles. Go nuts!
Free-handing Marble Effect Cake Icing
- Starting off with a crumb coated, chilled cake, divide the rest of the buttercream into two parts. One will be white and the other will need to be colored in a vibrant tone of your choosing.
- Cover your cake with a layer of white frosting and then start placing dots of colored buttercream in random spots on top.
- Use the offset spatula to blend them into the white buttercream, by doing a back and forth motion. Be careful not to overdo it.
- You can definitely also use some other tones, maybe doing a middle tone would be a good idea if you have the patience for it. Also, you can add some white frosting onto your spatula to continue blending everything together and achieve the final look.
- Fill a bowl with warm water and place it near you. We will dip the spatula in it to melt the butter in the frosting and sear everything in. It will fix any little hole or crack and will make it look shinier.
- Now you can get on to trimming and making everything appear neater so that you can decorate the top of your cake. As we said before, you can use whatever technique you like but we think marbled cakes are very elegant and should not be overcrowded.
What You’ll Need For Marble Effect Cake Icing
The equipment and ingredients you’ll need for marble effect cake icing will vary depending on what type of marble icing you’re making. For example, you can make a marble drip cake, marbled fondant, marbled buttercream, etc. Typically, marble icing requires the following equipment and ingredients:
- electric mixer for the icing
- bench scraper
- offset spatula
- buttercream/fondant/icing-covered cake
- food coloring
Marble Buttercream Technique
Perfecting the marble buttercream technique can be tricky, and there are a few ways that you can do this. Let’s take a look at another way of applying the marble effect to your buttercream. For this recipe, you’ll need the following ingredients:
- 2 cups of unsalted butter
- 4 cups of icing sugar
- 1 tablespoon of vanilla extract
- 3 tablespoons of milk
- gel food coloring of choice
Now all you need to do is:
- First, you’ll need to make the buttercream. Add the butter to a bowl and beat until soft. Slowly add the icing sugar, one cup at a time, mixing after every cup. Now add the milk and vanilla extract. Keep mixing until the buttercream is light and fluffy.
- Take around half of the buttercream and place it in a bowl, along with the food coloring of your choice. Mix well until you achieve the color you’re looking for.
- With the colorless half of your buttercream, frost your cake and smooth it with a spatula or bench scraper.
- With your colored buttercream, place small amounts in random patches around the cake. Repeat the smoothing motion and it will create the marbled effect that you’re looking for.
Marble Drip Cake Recipe
If you’re looking to make a marble drip cake, then we have the recipe for you. The ingredients you’ll need for this recipe are:
- 1 baked and frosted cake
- 3 cups of confectioners sugar
- 1 tablespoon of corn syrup
- 1/4 cup of warm water
- 1/2 teaspoon of vanilla extract
- 8-10 drops of food coloring (for each color)
- 1/2 teaspoon of edible glitter dust
Now all you need to do is:
- Allow your cake to cool before doing anything. Frost your cake with buttercream and cover it with fondant. You’ll also need to line a sheet with foil and add a wire rack on top. Place cake on top.
- Grab a bowl and add the sugar, syrup, water, and extract. Mix well until smooth. Add 8-10 drops of food coloring into the icing (of each color that you’re using) and leave it as it is.
- Now drizzle the icing over the top of your cake and it will marble as you pour. Sprinkle glitter dust over the top and leave to set. Slice, serve, and enjoy!
How to Make Marbled Fondant
If you’re looking to make marbled fondant, you’ll need the following ingredients and equipment:
- 24oz of white fondant icing
- colored rolled fondant
- icing colors
- fondant roller
- fondant mat
- toothpicks
Now all you need to do is:
- Choose two colors of fondant and roll them into log shapes, that are similar in size. You’ll now need to place them alongside one another and fold them in half, then twist. Keep twisting and folding until the colors have started to blend and then roll into a ball.
- Once you roll out the fondant, you’ll see that you’ve achieved the marble effect in the fondant that you’re looking for.
- You can use more than two colors, just make three/four logs of different colored fondant, instead of two.
- Apply fondant as you usually would.
Conclusion
I hope this post has helped you to become more familiar with how to achieve marble effect cake icing, quickly and easily. What do you think? Have you tried making a marble cake before? What colors did you choose? Leave a picture below, we would love to see it. And please feel free to leave any tips and tricks for marble effect cake icing in the comments below.

Karen is a passionate pastry chef who loves to create delicious baked goods. She has been in the culinary arts for over 10 years, honing her skills and perfecting her craft. Karen is known for her creativity and attention to detail, creating unique desserts that bring a smile to everyone’s face. She is always looking for ways to challenge herself and come up with new recipes that are both tasty and visually appealing. Karen loves to experiment with different flavors and textures, and she is committed to providing the highest quality of products to her customers.